Super Sale Limited Time 50% OFF for All-Access Plans
Save 50% Now
Home / Learn / Tutorials / Metronic Tutorials / Metronic Bootstrap Admin Installation with Gulp

Metronic Bootstrap Admin Installation with Gulp

By Shane L on 5 years ago

Before we start with the installation, we will need to make sure that all the necessary files and dependencies are ready and installed. If you already have all the items below downloaded and installed, you can proceed to the next step.

Step 1: Dependency Installations

The first and most important file to get is Metronic. You can purchase and download it here: https://themeforest.net/item/metronic-responsive-admin-dashboard-template/4021469

Once downloaded, extract the file and it should look something like this:

Metronic Folder

Note: The version number may differ when there is a new version available. However, the process will be the same.

Next, we need to download and install Node JS. Node.JS is a Javascript Runtime Environment that allows us to have convenient build tools for all our customers to enjoy.

Node JS: https://nodejs.org/en/download/

Step 2: Package Managers

Once you have Node JS installed, navigate to your extract location of Metronic and browse to our default HTML version’s tools folder: [Metronic]/theme/html/tools/

Open your command prompt by typing in “cmd” in the address bar of in your windows explorer:

cmd shortcut

For Macs, you will need to open up your terminal and type in the path to the same tools folder above.

Once your command prompt is open, we will proceed to install our package managers by typing in the following command in the command prompt:

npm install --global npm@latest


install npm

Once it is done installing, you will be able to start typing new commands when it is done. We need to install yarn by typing in this command in the same command prompt

npm install --global yarn


Again, once yarn’s installation is done, next package to install is Gulp. You can install it by typing this command:

npm install --global gulp-cli


If you already have an older gulp version installed, you may need to uninstall it to ensure that the older version does not conflict with the latest Gulp version. You can remove it by using this command:

npm rm --global gulp


Once Gulp is installed, you can verify the version by typing this:

gulp --version


Now that all prerequisite packages have been installed, we can proceed to download and install Metronic’s plugin dependencies. To do so, key in:

yarn

Step 3: Compiling Assets

Once all plugin dependencies are done installing, within the same command prompt, key in:
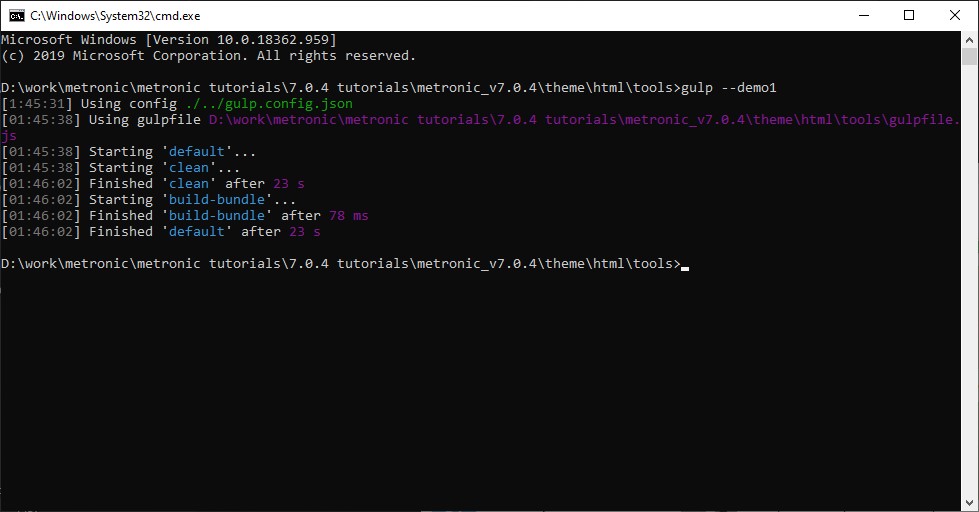
gulp --demo1


To start compiling and deploying the assets (e.g. JS, CSS, media files, plugin files) to the dist folder. The “dist” folder is where all the Metronic HTML files are located. You can control which demo assets you would like to compile by changing the command option.

A command option is a certain keyword that comes after 2 hyphens, in this case it is “--demo1”. By using --demo1, you are instructing the script to compile and deploy demo 1 assets, therefore, if you need to compile and deploy another demo, simply switch this option to another demo name (e.g. --demo2).

Once gulp is done, it should look something like this:

gulp installation completed

Step 4: Running Metronic

There are 2 ways we can run Metronic. First, we can simple open our index.html in a browser. You can locate the index.html in /themes/html/<demo>/dist/index.html

Second, you can run Metronic on a localhost environment by typing in the command below within the same command prompt you have opened:

gulp localhost


Once your localhost is up and running, copy the localhost URL from the command prompt:

gulp localhost

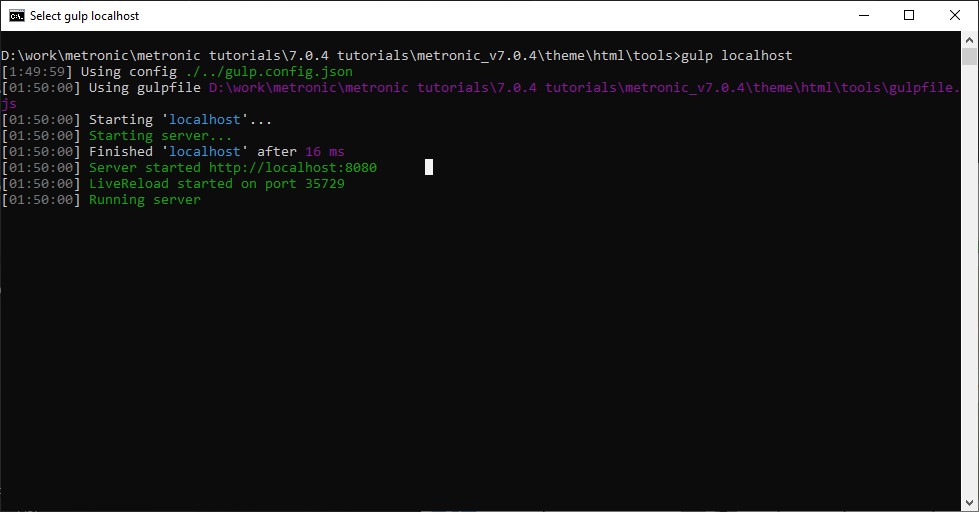
The default localhost URL should be http://localhost:8080

That’s it! You can now start browsing Metronic’s dashboards, widgets, datatables, and so much more.

We also have a video tutorial of this topic here: https://keenthemes.com/tutorials/install-metronic-with-gulp

Shane L
Shane L | Keenthemes Team

Comments (12)

Ubaid
8 hours ago

"Exactly! That's a perfect way to put it. The process is all about setting up your build environment correctly so the tools do the heavy lifting. It's just like getting into 3D printing. You wouldn't just unbox a new printer and expect a perfect model, right? First, you need the 'blueprint'—that's your downloaded Metronic files. Then, you need the 'slicer' to translate that blueprint into instructions your printer understands. That's where tools like https://prusaslicer.cc/ come in. You install it, configure the settings for your specific printer (which is like running 'npm install' and 'yarn' to get all the dependencies in order), and finally, you 'slice' your model to generate the G-code. That final step is exactly what 'gulp --demo1' does—it compiles all your raw assets into a finished, deployable product.

Aqsa
8 hours ago

To install Metronic Bootstrap Admin with Gulp, start by making sure you’ve downloaded the latest version of Metronic from ThemeForest and unzipped it properly. Then, install Node.js from the official site so the build tools can run smoothly. Once Node.js is set up, go to the extracted Metronic folder, navigate to theme/html/tools/, and open Command Prompt right from that directory — just type “cmd” in the address bar and hit Enter. From there, run npm install to pull in all the dependencies listed in package.json. After that, use gulp or gulp build to compile the assets, generate the CSS and JS files, and kick off the development workflow. This setup process feels almost like getting darmowe spiny do coin master, it gives you a nice head start without any extra effort, so you can jump straight into building and customizing your admin dashboard with everything already optimized and ready to go.

Abu
8 hours ago

Yeah, the installation process is pretty straightforward once you get the hang of it. The key thing is making sure you have Node.js installed first, then navigating to that tools folder and running the commands in the right order. I actually went through this recently and found that running npm install followed by gulp does the trick nicely - it compiles all the assets and gets everything ready to go. The localhost option is super handy for development too, since you can see changes in real-time without manually refreshing. It's kind of like how creating a feather client account create streamlines your whole gaming experience - once you've got that initial setup done properly, everything just works smoothly and you can focus on the fun stuff rather than troubleshooting. Same with Metronic - get the dependencies sorted first, and then you're free to customize your admin dashboard without any headaches!

Fakhar
1 week ago

To install Metronic Bootstrap Admin with Gulp, start by downloading the latest version of Metronic from ThemeForest and extracting the files. Then install Node.js from the official website so you have the runtime needed for the build tools. Once that's done, open your extracted Metronic folder, navigate to theme/html/tools/, and open a command prompt right from that location—on Windows just type "cmd" in the address bar and hit Enter. Run npm install to pull in all the dependencies, followed by gulp or gulp build to compile the assets and generate the CSS and JavaScript files. This kind of streamlined setup is a lot like tracking down a reliable alight motion latest version mod apk—you want everything configured just right from the beginning so the editing experience is smooth, with all the premium features unlocked and ready to go. Once the build finishes, your Metronic admin dashboard will be fully optimized!

Flex
3 weeks ago

To install Metronic Bootstrap Admin with Gulp, first ensure you have downloaded the latest version of Metronic from ThemeForest and extracted it properly, then install Node.js from the official website so you can run the required build tools; once Node.js is installed, navigate to the extracted Metronic directory, go to the theme/html/tools/ folder, open Command Prompt directly from that location by typing “cmd” in the address bar, and run npm install to install all dependencies defined in package.json, followed by gulp or gulp build to compile assets, generate CSS/JS files, and launch the development workflow—this automated setup works much like streamlining product packaging for bulk disposable carts in eCommerce, where structured processes improve efficiency and scalability, ensuring your Metronic admin dashboard is fully optimized and ready for customization and deployment.

Fanix
1 month ago

To install the Metronic Bootstrap Admin with Gulp, start by ensuring all necessary files and dependencies are ready. First, download Metronic from ThemeForest and extract it, making sure you have the latest version. Then, install Node.js from its official site, which provides the JavaScript runtime environment required for build tools. After that, navigate to the tools folder in your default HTML version ([Metronic]/theme/html/tools/) to set up package managers like NPM or Yarn. This setup allows you to run Gulp tasks for compiling CSS/JS, optimizing assets, and live-reloading your project efficiently, similar to how a professional AC maintenance service ensures all system components are properly installed and maintained for smooth operation.

michael
1 month ago

This guide on Metronic Bootstrap Admin installation with Gulp is really helpful for setting up a clean, automated workflow. Gulp makes asset management and builds much smoother, especially for large admin templates like Metronic. Alongside efficient dashboards and tooling, having a viral video download tool also adds value when managing or showcasing media-driven projects.

Carlos
1 month ago

Thanks for sharing this—really helpful guide. So basically, you download Metronic and Node.js, then navigate to the tools folder in the terminal. Run a few commands to update npm, install yarn and Gulp, then remove any old Gulp versions to avoid issues. Once that's done, just run yarn to install dependencies, then compile with something like gulp --demo1 for your chosen demo. You can open the HTML directly or use gulp localhost to preview. It's like making sure you've got all the right files before diving in—similar to setting up the super bear adventure apk mod properly so everything runs smoothly from the start.

Bravestoneson
1 month ago

To install Metronic Bootstrap Admin with Gulp, start by downloading Metronic from and Node.js from. After extracting Metronic, go to [Metronic]/theme/html/tools/ and open the command prompt (Windows) or terminal (Mac). Install the latest npm using npm install --global npm@latest, then yarn with npm install --global yarn, and Gulp via npm install --global gulp-cli. Remove any older Gulp versions with npm rm --global gulp and verify the installation using gulp --version. Next, install Metronic’s plugin dependencies by running yarn and compile assets with gulp --demo1, which deploys JS, CSS, media, and plugin files to the dist folder; you can switch --demo1 to another demo as needed. This setup process is crucial for a smooth workflow, just like properly installing the pixel car racer mod super cars Apk racing ensures a flawless gaming experience.

Text format options
Here's a how to add some HTML formatting to your comment:
  • <strong></strong> to make things bold
  • <em></em> to emphasize
  • <ul><li> or <ol><li> to make lists
  • <h3> or <h4> to make headings
  • <pre></pre> for code blocks
  • <code></code> for a few words of code
  • <a></a> for links
  • <img> to paste in an image (it'll need to be hosted somewhere else though)
  • <blockquote></blockquote> to quote somebody
  • happy :)
  • shocked :|
  • sad :(

Popular Blog Posts

Metronic 8 is Live!

Keenthemes team elevates the most advanced and multifunctional admin dashboard theme to a new lev...

5 reasons to use Bootstrap admin template

It’s no doubt that when a development takes longer to complete, additional costs to integra...

Getting Started with Datatables

Datatables are basically HTML tables that consists of large quantities of data within each row...